Showing posts with label Crazy About You. Show all posts

Tuesday, August 11, 2015

Just Sayin' Hello


Here is a quick and simple card using a masking technique. I masked off a portion to make space for my sentiment. I ended up using the "Hardwood' background stamp to give a little bit more texture to the card.  Below is a tutorial on how to make the card:


Below are the products I used from Stampin Up. If you would like any of these products, please shop my online store. Click HERE to access it. If  you purchase $25.00 or more from my online store, I will send you a Stampin Up annual catalog and a mini-holiday catalog.

Built for Free Using: My Stampin Blog

Thursday, May 21, 2015

Second & Third Generation Stamping

Here is a card I made using a technique where I stamped off the image once (and sometimes twice) before I stamped the card panel because I wanted a lighter background so that my sentiment stands out. This technique allows you to get more "colors" from your ink pads. I stamped of all the ink color twice; except for the Marina Mist, which I stamped off three times to get the sky blue color.

* 1st Tip: To get a clean cut from this intricate die, put wax paper between the card stock and the die. You will be able to peel out your sentiment easily.

* 2nd Tip: I cut the "S" off the "thanks." This also allows you to stretch your dies.


I used all products from Stampin Up.  Please click HERE to shop my store. Here is a list of products I used:
  • Calypso Coral Ink (#126983)
  • Marina Mist (#126962)
  • Pear Pizzazz (#1Crumb Cake (#126975)
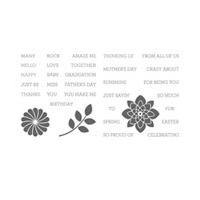
  • Crazy About You Stamp set (#138859)
  • Hello You thinlits (#137363)
  • Calypso Coral card stock (#122925)
  • Whisper White card stock (#100730)
  • Crystal Effects (#101055)
  • Wink of Stella in Clear
Also, if  you purchase $150 worth of products (before taxes and shipping), I will mail you a free 2015-2016 catalog and a retired Hostess Wooden Stamp set "Good Greeting" - it has 19 sentiments. This is in addition to a $25 worth of hostess gifts that you can use to purchase hostess exclusive stamps.

This is only for the 1st customer who makes this purchase. I only have ONE, so hurry before it's gone. *** Please email contact me right after your place your order***


Monday, February 2, 2015

Happy Birthday Texture card.


Here is a card I created inspired by the On-line Card Classes- Clean and Simple 4. I used my new goodies from Stampin Up to create this adorable card.

Here are the steps:
  • Die-cut multiple sentiments using a framelit. Use wax paper in between the die and the cardstock to make it easier to remove the paper from the die.
  • Adhere randomly on a cardstock trimmed to 5 1/4 x 4. Trim excess sentiment. Fill in the empty spaces with the leftover pieces. Adhere to colored card stock base (A2 size - 5 1/2 x 4 1/4)
  • For the "birthday" sentiment, I used the new Color Box chalk new to Stampin Up, stamped my sentiment, and covered it with clear embossing powder to make it shiny. Heat set.
  • Die cut the sentiment with a banner framelit. Adhere with Stampin Up dimensionals. 
Click HERE to visit my store. 

Wednesday, January 28, 2015

"Love" Clean & Simple Embossing

I am so motivated!!! I am taking this online card class and it is really breaking me out of my creative rut. Here is the card that I cased from the class. Hope you like it.
Here is what you will need to make this card panel:

  • Cut the masking paper at 3 3/4 square (or the shape of your panel. My panel is 3 3/4 x 5 1/2.) Use any basic shape die cut you want for your focal point. Die cut.
  • Using Versamark ink, cover your entire background stamp with it.
  • Place your die-cut masking paper on the white cardstock. Don't worry, it will not hurt the ink at all.
  • Next, cover your shape (in this case, the heart) with red embossing powder. Heat set. Try and avoid the uncovered parts of your cardstock to prevent the Versamark ink from drying out. Slowly peel off the masking paper.
  • Then, cover the rest of your card with the second color of embossing powder. Using a soft brush, brush off any excess that may stick onto your shape. Heat set.
  • Die cut a sentiment to go across your shape. Adhere.
  • I colored the clear rhinestones with Cherry Cobbler Stampin Blendabilities.


Most of the products are from Stampin Up. Please click HERE to visit my store.
  • Hardwood Background Stamp #133032
  • Embossing Powders - Cherry Cobbler #122949 & Silver #109131
  • Framelits - Hearts #125599 & Expressions (Retired)
  • Whisper White paper #100730
  • Basic Black #121045
  • Rhinestones #119246
  • Stampin' Blendabilities - Cherry Cobbler #130995